You must replace (or sharpen) your Cricut blade regularly to keep your cuts crisp and complete. To do this, you need to know how to remove and replace your blades.
Each Cricut machine houses precise blade and housing combos. As such, you’re going to follow slightly different steps depending on whether you’re using an Explore, Maker, or first-generation Cricut machine. Don’t worry; we were sure to include instructions for all models.
Step 1: Remove the Blade Housing from Your Machine
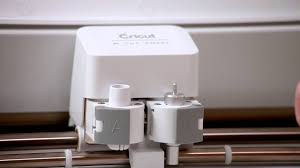
First, you need to remove the blade housing from your Cricut. If you’re using an Explore or Maker, you will need to opening Clamp B on the double tool holder. If you’re using an older model Cricut machine, you will have to unscrew the black arm that holds the cricket blade housing in place. Most users find that they can extract this screw manually.
In either case, you will need to access the cutting assembly inside the machine. This is always located on the exterior of the plotter. Open the door on your Cricut machine, and this should be the first thing you see.
Once you’ve loosened the clamp that holds the blade housing, you can slip it out.
Step 2: Eject the Blade CAREFULLY!
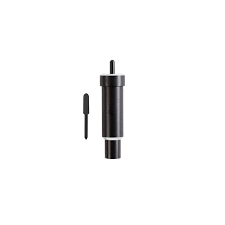
All Fine-Point, Premium Fine-Point, Deep Point, and Deep-Cut blade housings feature small plungers. Gently suppress the plunger on your blade housing to release the blade. Make sure that the blade housing is positioned over a small catch basin or cutting mats. Blades are small and, therefore, very easy to lose. Trust me; I’ve made this mistake multiple times.
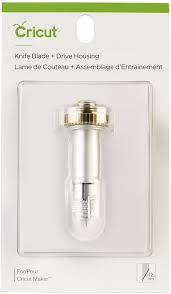
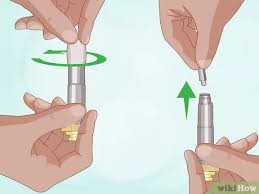
Removing Knife Blades
If you’re replacing a Knife Blade, you will need to place a changing lid over the blade and housing sleeve. This element is included in your purchase of a replacement blade. Place the changing lid over the blade-side of the blade housing. Hold the housing tightly in one hand. Meanwhile, use your other hand to twist the changing cap counterclockwise. After this, you will have to flip the housing so that the blade is perpendicular to the table. The blade should slide out.
Removing Rotary Blades
If you’re using a Rotary Blade, you will need to use a blade changing kit. Place the empty changing cap over the blade and housing sleeve, then use the provided screwdriver to loosen the blade nut. Do not remove the old blade or washer from the cap. They may be dull, but they can still cut you!
Whenever I’m replacing a blade, I always place my old blade in the plastic casing that my new one came in. I find this to be a reliable temporary protective cover. Eventually, you will need to discard your used blades. Or, if you’re like me, you might keep a few used blades on hand for crafting emergencies.
Step 3: Prepare Your New Blade
Remove the plastic cover from your replacement blade unless it is a Knife Blade or Rotary Blade. These come with changing caps. The changing caps are designed to cover the blades at all times. This keeps crafters like you and me from injuring our fingers during blade changes.
Step 4: Insert the New Blade
Installing Fine-Point, Premium Fine-Point, Deep-Point, and Deep-Cut Blades
Insert your new blade into the appropriate housing. If you’re installing a Fine-Point, Premium Fine-Point, Deep-Point, or Deep-Cut blade, grip it tightly by the cutting end, then gently insert it into the slot at the bottom of the blade housing. The magnet inside the casing should hold the blade in place. If the blade is installed correctly, only the tip should be protruding from the end of the housing.
Installing Knife-Point Blades
If you’re installing a Knife-Point blade, place your new blade into the slot at the bottom of the housing. The indent on the blade should be aligned with the groove inside the housing. Replace the housing screw, then twist the changing cap until it is tight. After this, you can remove and dispose of the changing cap.
Installing Rotary Blades
If you’re replacing a Rotary blade, you will need to insert the new blade into the slot at the bottom of the housing. After that, replace and tighten the housing screw that holds the black arm in place.
Remember, all blades must be paired with the appropriate housings. You can reuse your housings indefinitely, so long as they do not become damaged or lost. Never attempt to use a housing that is not congruous with your particular Cricut machine.
Step 5: Reinstall the Housing
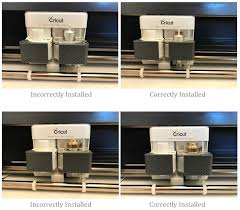
Once you’ve installed a new blade, you can reinstall the housing. On Maker and Explore models, you must slide the housing into clamp B. Make sure that the housing is sitting directly on top of clamp B. Otherwise, your machine may struggle to cut material. Once your blade housing is properly aligned, push down clamp B. You will need to apply a slight bit of pressure. When clamp B is closed properly, it aligns perfectly with clamp A.
In the case of earlier Cricut models, you will need to place the blade housing beneath the black tool arm and tighten the screw.
Purchasing Replacement Blades
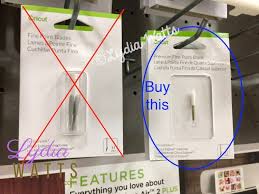
You can purchase Cricut replacement blades and housings directly from Cricut, local craft stores, and Amazon. Most crafters prefer to work with a variety of blades. After all, each type of blade tends to work well with a specific assortment of materials. While there are plenty of generic options out there, I have a tendency to be brand-loyal.
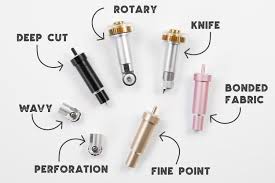
Fine-Point Blades
Most Cricut machine’s come with a fine-point blade. These blades are good for cutting paper, vinyl, and iron-on.
Deep-Point Blades
Deep-point blades are designed to cut through thick get pliable materials, such as felt, cardstock, and foam.
Rotary Blades
Rotary blades are specifically engineered to cut through fabrics with backings.
Knife Blades
Knife blades are especially rugged and sharp. As such, they are often used to cut through extra-thick or durable materials, including wood and leather.
What NOT to Do with Cricut Blades.
As you can see, it’s quite easy to replace Cricut blades. Still, here are a few common mistakes you’re going to want to avoid when you’re replacing yours.
Don’t Rush To Replace Your Blades!
Check out our previous post for instructions on how to sharpen Cricut blades. You can easily extend the life of a blade with the help of this clever trick.
Don’t Leave Your Blades in the Open
Please, keep your spare and unused blades covered. I cannot tell you how many times I pricked my finger reaching into a drawer full of uncovered blades. Consider purchasing a tool and blade caddy, or make your own blade and housing holder.
Don’t Jam ‘Em!
Always use the correct blade and housing pairing. Your machine is calibrated to handle precise pairings. A wrong combination could result in damage to your machine, mat, and blade housing.
Wrapping Up
Your blade is the backbone of your Cricut machine. As such, you must always keep your sharp and in good running order. Replacements can be expensive. As such, we always recommend that you attempt to sharpen yours before replacing them. We hope these tips and tricks come in handy when you do need to replace yours! As always, feel free to drop your questions and concerns in the section below. Stay tuned for more Cricut tips and tricks!